
ActionSheet 를 사용하는데 deprecated 되었다고 confirmationDialog를 사용하라고 합니다. 바로 알아봅시다.
ConfirmationDialog
가장 기본적인 confirmationDialog 입니다. 첫번째 인자로 titleKey가 들어가고 isPresented 에 바인딩값을 연결해준 뒤 action 클로저 안에 우리가 평소에 쓰는 Button을 쭉 나열하면 됩니다.
struct ContentView: View {
    @State var isPresented = false

    var body: some View {
        Button(action: {
            isPresented = true
        }) {
            Text("사진 불러오기")
                .padding()
        }
        .confirmationDialog(
            "제목",
            isPresented: $isPresented,
            actions: {
                Button("카메라") {
                    print("카메라 선택")
                }
                Button("라이브러리") {
                    print("라이브러리 선택")
                }
            }
        )
    }
}
기본적으로 Cancel 버튼이 존재하고 제목이나 메세지가 생략이 가능합니다.
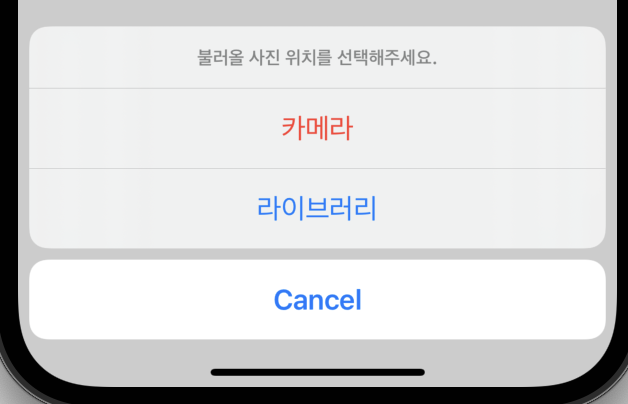
메세지 추가
.confirmationDialog(
            "제목",
            isPresented: $isPresented,
            actions: {
                Button("카메라") {
                    print("카메라 선택")
                }
                Button("라이브러리") {
                    print("라이브러리 선택")
                }
            },
            message: {
                Text("불러올 사진 위치를 선택해주세요.")
            }
        )
제목 추가
세번쨰 인자로 존재하는 titleVisibility 를 통하여 설정 가능합니다.
.confirmationDialog(
    "제목",
    isPresented: $isPresented,
    titleVisibility: .visible,
    actions: {
        Button("카메라") {
            print("카메라 선택")
        }
        Button("라이브러리") {
            print("라이브러리 선택")
        }
    },
    message: {
        Text("불러올 사진 위치를 선택해주세요.")
    }
)
ActionSheet.Button의 .destructive
.destructive 의 설정은 Button을 생성할 때 할 수 있습니다.
Button("카메라", role: .destructive) {
    print("카메라 선택")
}
확실히 기존의 ActionSheet 보다 더욱 더 선언형에 맞게 변화된 모습이 보이네요. 사용하기에도 더욱 편한것 같습니다.
반응형
'ios > swiftUI' 카테고리의 다른 글
| SwiftUI - Preview를 유용하게 사용하는법, previewLayout, 가로모드 Preview (0) | 2022.07.02 |
|---|---|
| SwiftUI - Color 16진수로 표기된 색상 사용하기, hex 색상 사용하기 (0) | 2022.07.02 |
| SwiftUI - 탭하여 키보드 숨기기 (0) | 2022.07.01 |
| SwiftUI에서 UIKit의 Alert 사용하기 (0) | 2022.05.10 |
| SwiftUI에서 UIkit, StoryBoard 사용하기 (0) | 2022.02.04 |